Quantcast
Channel: dynamics ax – Goshoom.NET Dev Blog
Viewing all 117 articles
Browse latest View live

Unit testing in AX – Dependencies

$
0
0

In my previous post on unit testing, I explained how to handle a few simple situations, nevertheless things often get more complicated. One such complication occurs if the class that you want to test uses other objects. It may be a problem for several reasons – it’s code that we don’t want to test in the moment (because it would become too complex), it depends on something that we can’t control by our test (e.g. values returned from an external system), it’s too slow and so on.

The solution is to remove tight coupling between units and allow substituting dependency objects with something provided by the test (= dependency injection). Following these design principles will also make your code more flexible and easier to maintain, therefore designing code for testing will force you to make your code better in several aspects.

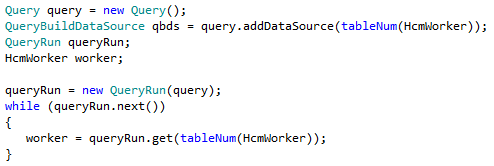
Let me show you a very simple example, where I have a single dependency on database:

public Amount availPhysical(ItemId _itemId, InventDimId _inventDimId)
{
    InventSum is = InventSum::find(itemId, inventDimId);
 
    return is.PostedQty
        + is.Received
        - is.Deducted
        + is.Registered
        - is.Picked
        - is.ReservPhysical;
}

If we want to test this method with different values, we would have to save new values to database before running each test. It can be complicated due to references to other tables, and changing data in database would influence everybody using the same data, including other running tests. There are some ways how to do it, but we’ll now try to avoid database completely. Also note that operations in memory are much faster than accessing database, so you can run huge amount of tests in very short time.

If you look at the method, you’ll notice that it does two different things – it finds an InventSum record and it does the calculation. If we split it to two methods, each with its own responsibility, testing the calculation becomes trivial.

// The complicated calculation logic was extracted to this method
public Amount calcAvailPhysical(InventSum _is)
{
    return _is.PostedQty
        + _is.Received
        - _is.Deducted
        + _is.Registered
        - _is.Picked
        - _is.ReservPhysical;
}
 
// The remaining code is here
public Amount availPhysical(ItemId _itemId, InventDimId _inventDimId)
{
    return this.calcAvailPhysical(InventSum::find(_itemId, _inventDimId));
}

Now we can easily write tests like this:

InventSum is;
is.Received = 8;
is.ReservedPhysical = 5;
 
this.assertEquals(3, new MyClass.calcAvailPhysical(is));

This covers calcAvailPhysical(), but what about availPhysical()? Honestly, I don’t think it’s worth investing time into. It calls only two methods, without any conditions or anything. The only thing it could go wrong is using wrong parameters for find() and it may be covered by code review and other types of testing.

You might say that you to want cover all code by unit tests and it would indeed be nice, but on the other hand, you have to think about the price and whether you really want to test the data access layer at all. This example demonstrates the approach I prefer – extracting complicated pieces of logic and test them thoroughly. The parts that are difficult to test are kept trivial and unlikely to change very often.

There surely are cases when testing against database is needed, such as when the most important logic to test is a database query. I’m going discuss database access in a later post.

Let’s look at a few other cases involving dependencies.

Maybe you have quite a few values you would have to pass to your method and the number of parameters would grow quickly. You can always create a class functioning as a data container and use it instead of many parameters (think of data contract – it’s the same design pattern).

In the example above, the method got everything in parameter. But it’s often not the best design; another variant is setting dependencies to object’s state.

Here I have a little bit more complex example. I’m going to test ClassToTest; unfortunately it uses DependencyObject which I don’t want to cover by my test.

class ClassToTest
{
    DependencyObject depObj;
 
    new()
    {
        depObject = DependencyObject::construct(MyParameters::find().DependencyType);
    }
}

DependencyObject is instantiated inside ClassToTest, therefore my test can’t control it. Furthermore, it’s initialized in different ways depending on a parameter in database, therefore my test would have to know about this implementation detail and change the parameter as needed (with all the troubles mentioned before).

Let’s just slightly refactor the class. We’ll allow setting depObj via a parm* method, while keeping the initialization logic in place in a factory method:

class ClassToTest 
{
    DependencyObject depObj;
 
    // Caller code can set the dependency through this method
    public DependencyObject parmDependencyObject(DependencyObject _depObj = depObj)
    {
        depObj = _depObj;
        return depObj;
    }
 
    // The class still offers a method for initialization from the parameter,
    // but it's now just one of possible ways.
    public static ClassToTest newDefault()
    {
        ClassToTest c = new ClassToTest();
        c.parmDependencyObject(DependencyObject::construct(MyParameters::find().DependencyType));
        return c;
    }
}

Now tests can create DependencyObject in any way they need and they don’t have to use the parameter table at all.

ClassToTest c = new ClassToTest();
DependentObject d = ...
c.parmDependentObject(d);
 
... act and assert ...

This makes the solution more flexible too – if you have a new requirement that needs depObj created in some other way, you can use reuse the class without any change. This is yet another example where designing for testability leads to more robust architecture.

Note that you don’t want to always expose all dependencies to caller code, because it would reveal implementation details that should stay hidden in the class.  As with any other development, you have to weigh many aspects when designing architecture of your program. By the way, if you write .NET components, you can hide such logic inside assemblies and access internal members from tests with the help of InternalsVisibleTo.

The technique shown above work great if all what we need is to inject specific values to the tested unit, but sometimes we want to inject different behaviour. In many cases, we want simply to “turn off” some logic interfering with the test.

For example, doStuff() runs some logic I want to test and it prints a report.

void doStuff()
{
    ... some interesting logic ...
 
    reportRun.run();
}

To avoid all potential troubles with printing inside test, we can replace actual reportRun with a custom subclass overriding run() method and doing nothing:

MySRSReportRunDoingNothing extends SRSReportRun
{
    public void run()
    {
        // Nothing here
    }
}

The test will inject the dummy object (so called test stub) into the class under test:

ClassToTest c = new ClassToTest();
c.parmReportRun(new MySRSReportRunDoingNothing());
c.doStuff();
... assert ...

By the way, there may be better ways for designing the code – for example, I could extract the logic to test into a separate method or add a flag controlling whether the report should be printed or not. Therefore if you find yourself writing many test stubs, maybe you should focus more on design for testability.

You can do much more with these test stubs. Instead of disabling all functionality as above, you can actually configure them to do whatever is useful for your test. For example, they can simulate access to database or calls to web services and return exactly what you need:

class WebServiceTestStub
{
    public str getData(str _id)
    {
        if (_id == "Test1")
        {
            return "Data expected by a specific test case"
        }
        ...
    }
}

You can also use these objects to verify whether system under test did what it should have done. For example, you test a piece of logic that should call posting. You don’t want to run the posting itself, but you want to verify that it got called (and didn’t get called if a validation failed). You can create a so-called mock object to remember that post() was called and then write assertions for it.

ClassToTest c = ...
c.parmPosting(new MockPostingSubSystem());
c.run();
 
this.assertTrue(c.postWasCalledOnce());

This goes way beyond mere isolation – it’s a quite different type of testing.

By the way, you can find sophisticated mock frameworks for other languages, which greatly simplify working with these objects. You don’t have to create them by yourself; you can just configure what type you want to mock, what’s the expected behavior and so on.

Just to give some idea, the following test (written in Java with jMock) creates a mock for Subscriber class and defines that its receive() method should be called with a given message. The framework creates the mock object for you at runtime and verifies the expectations. If receive() isn’t called exactly once or the parameter is wrong, the test will fail.

public void testOneSubscriberReceivesAMessage()
{
    // set up
    Mock mockSubscriber = mock(Subscriber.class);
    Publisher publisher = new Publisher();
    publisher.add((Subscriber) mockSubscriber.proxy());
 
    final String message = "message";
 
    // expectations
    mockSubscriber.expects(once()).method("receive").with( eq(message) );
 
    // execute
    publisher.publish(message);
}

Some mocking frameworks allow things like mocking static methods, therefore you could take a piece of code (written without taking testing into account) and mock out inconvenient find() methods, for example. Unfortunately we don’t have any such framework for X++ (Ax Dynamics Mocks never got far enough), but my hope is that we’ll get it (or build it) one day. AX 7 will give us new ways how to achieve it.

Nevertheless mocking frameworks are by no means necessary for unit testing – they just make things more convenient.

When you’re writing a class with a dependency, it’s worth to consider using interfaces instead of specific classes. First of all, it makes your code really flexible without unnecessary restrictions. For example, if you need logging in your class, you need just some object that can accept a logging message and you don’t really care about what kind of object it is. Therefore create an interface and use it as the type of your dependency:

interface ILogger{
    void logMessage(Exception _ex, str _msg)
}
 
class MyClass
{
    ILogger logger;
}

That’s a nice, robust implementation – you can easily replace one way of logging with another and you can even introduce things like composite loggers calling several other loggers – all without ever changing your class. But it also means that you test stub doesn’t have to inherit from an existing logger – it can be any class implementing the right interface. It’s much easier, because if your test stub inherits code from a parent class, you often have to be very careful to override all methods called by the class under test. With interfaces, the compiler tells you what to implement and you’re sure you don’t inherit anything you don’t want.

You can see that it’s all about designing code in a way that make testing easy. People new to unit testing often don’t realize it and try to test virtually untestable code. It’s no surprise they find it awkward and complicated – they should refactor the code first before testing it. This is an obviously problem with a lot of standard code in Dynamics AX, because you can’t test it and you also don’t want to change it (to avoid upgrade conflicts in future). My advice may be surprising: just don’t it. Test your code and not code developed by somebody else, such as Microsoft and ISVs. Yes, you often modify standard code, but if you keep things separated, you can test your code by unit tests and leave the integration with standard code to a different type of testing. It works really well for me – give it a try.

Although we’ve covered quite a lot today, there are whole books on this topic (even I would have much more to say) and a single blog post can only scratch the surface. I hope it makes some sense to you, because I think it’s what people often miss when starting with unit testing – and why they ultimately give it up. They quickly learn things like assertion methods, but never get to know how to design complex code that still can be decomposed to units for unit testing. I showed you a few basic techniques, but it’s mainly for demonstration. As with any other code, you have to use to use your own developer skills to design the best solution for your particular situation.


Preview of Release Management

$
0
0

When you develop a new solution, it’s useless until you deploy it to a production environment where users can actually use it. Before you can do it, you typically need a few extra deployments to test environments. It takes time that people could use for working on new features and it often require many manual steps, which is always error-prone. Automation can both save resources and prevent people from doing something wrong. The need is getting more urgent as release cycle shorten to deliver new features to users as soon as possible.

Release Management for Visual Studio can help you to do that. It allows you to define the release process and approvers, execute deployments, track their history, send email notifications and so on. You still have to define what steps will run and what they’ll do; the value of Release Management is in handling all the infrastructure around.

I spent some time preparing releases of Dynamics AX with Release Management for Visual Studio 2013 and 2015. Unlike Kenny Saelen in his blog series, I used so-called vNext release templates, which is a more lightweight approach, doesn’t require deployment agents and it uses either Powershell or Chef to handle all release tasks (here is documentation, if you’re interested).

I was a bit disappointed, because it lacked quite a few features I needed, especially VSO support for on-premise environments. Also diagnostics of release tasks was quite difficult and a few other things just didn’t behave as I would like.

Therefore I was really keen to jump into a preview version of the new Release Management, which promised to address several of my problems, and I’m happy to announce that it does. It doesn’t do everything I would like (at least not yet), but it’s a great improvement.

Let me demonstrate the basics on a simplified release of Dynamics AX. The project uses Visual Studio Online as the version control and XAML builds running on an on-premise server.

You don’t need your own Release Management server for on-premise deployments anymore; it’s all hosted in Visual Studio Online. You can find it on the Release tab, but currently (October 2015) only if you’re participating in the preview program.

Toolbar

When you create a new release template, you have to define one or more environments. Then you can manage and track how far you’ve released your code, such us that it’s currently in the FAT environment.

Environments

You need some tasks to do the actual work. As you can see, you have quite a few tasks to choose from:

AddTasks

Nevertheless my AX release is implemented completely in Powershell (I just slightly modified my existing scripts, based on DynamicsAxCommunity module), therefore I don’t use any other type of task:

To get files to deploy, link the release definition with an artifact source. In my case, I linked it with a team build, therefore my release will get all files produced by a particular build.

LinkArtifacts

Here I ran into a limitation, because my release scripts are not in the same team project as my AX code and I can’t easily link artifacts from other projects. That’s why I’ve put scripts to my environment and refer to them through absolute paths (\\Server1\RMScripts\…) accessible from all machines. If I could link artifacts from two projects, Release Management would download release scripts for me.

When triggering a new release, I can choose which build contains application files to deploy. I could also configure it to run automatically after a build (such as deploying a test environment immediately after a night build of latest code).

NewRelease

You can track progress of your release directly in your browser, including output from your tasks (such Install-AXModel and axbuild in the picture below). It’s wise keeping tasks relatively small, so you can easily see what’s running (or what failed, in a worse case).

RunningRelease

You need an agent installed in your environment, to handle all communication with VSO and execute tasks. Tasks can connect to other machines and deploy things there, therefore you may have a single agent deploying to dozen servers. On the other hand, you may want more agents, to running multiple releases in parallel or having agents with different capabilities (such as different software installed).

The agent can run as a Windows service, but you can also start it as a normal command-line application and monitor what it does.

Agent

And of course, you can see history of all releases, their status, logs and so on.

ListOfReleases

Although it’s still in a preview stage, it already runs really well. And because it’s so lightweight and allow integration of Powershell scripts with just a few clicks, I think I’ll use it even for small things that didn’t require any sophisticated solution before, but that will benefit from being easily available to the whole team and from archiving history of all runs.

The new Release Management is expected to be released this year; unfortunately I don’t know anything for specific in the moment. In the meantime, you can learn more about it from documentation on MSDN.

Configuration of LCS System Diagnostics

$
0
0

System Diagnostics from Dynamics Lifecycle Services is a really handy tool – it collects data about your Dynamics AX environments and warns you if your setup is not optimal from performance perspective, if a number sequence is running out of available numbers, if batches are failing and so on. It allows you to act proactively, rather than waiting for something serious to happen.

The only problem with this tool is configuration, because you have to grant the service account permissions to quite a few things, but you typically don’t want to allow everything. The recommended configuration therefore cherry-picks individual items to set permissions for, such as individual registry keys. It’s well-documented, unfortunately it still consists of a large number of manual steps and it’s very easy to do something wrong, especially if you have many servers to configure.

Below you can find scripts automating a few tasks, such as adding the service account to necessary user groups. It’s by no means exhaustive and you’ll still have to do many things manually, but it’s better than nothing. I didn’t mean it as any ambitious project; I merely implemented a few easy wins last time when I was configuring System Diagnostics – and now I’m sharing it with you.

Examples below expect that you’ve set variables with the domain and service account name:

$domain = 'MyDomain'
$accountName = 'LcsServiceAccount'

You’ll likely need to run the scripts “As administrator”.

# Adds system diagnostics service account to AX
Function Add-LcsAccountToAX
{
    Param(
        [Parameter(Mandatory=$True)]
        [string]$User,
        [Parameter(Mandatory=$True)]
        [string]$Domain,
        [string]$AxUserId = 'LcsDiag'
    )
 
    # Requires AX management module (e.g. running in AX management shell)
    New-AXUser -UserName $AccountName -UserDomain $Domain -AXUserId $AxUserId -AccountType WindowsUser
    Add-AXSecurityRoleMember -AxUserID $AxUserId -AOTName SysBusinessConnectorRole
}
 
# Usage:
Add-LcsAccountToAX -User $accountName -Domain $domain
# Grants access to registry keys
Set-RegistryReadPemissions
{
    Param(
        [Parameter(Mandatory=$True)]
        [string]$Account,
        [Parameter(Mandatory=$True)]
        [string]$RegKey
    )
 
    $rule = New-Object System.Security.AccessControl.RegistryAccessRule ($Account,'ReadKey','ObjectInherit,ContainerInherit','None','Allow')
 
    $acl = Get-Acl $RegKey
    $acl.SetAccessRule($rule)
    $acl | Set-Acl
}
 
# Usage:
 
$domainAccount = "$domain\$accountName"
 
# Run on AOS server
Set-RegistryReadPemissions -Account $domainAccount -RegKey 'HKLM:\System\CurrentControlSet\services\Dynamics Server\6.0'
 
# Run on database server
Set-RegistryReadPemissions -Account $domainAccount -RegKey 'HKLM:\System\CurrentControlSet\Control\PriorityControl'
# Adds service account to Windows user groups
Function Add-DomainUserToLocalGroup
{
    Param(
        [Parameter(Mandatory=$True)]
        [string[]]$Group,
        [Parameter(Mandatory=$True)]
        [string]$User,
        [Parameter(Mandatory=$True)]
        [string]$Domain,
        [string]$Computer = $Env:ComputerName
    )
 
    foreach ($g in $Group)
    {
        $adsi = [ADSI]"WinNT://$computer/$g,group"
        $adsi.psbase.Invoke("Add",([ADSI]"WinNT://$domain/$user").path)
    }
}
 
# Usage:
$groups = 'Event Log Readers','Distributed COM Users','Performance Monitor Users' 
Add-DomainUserToLocalGroup -Group $groups -Domain $domain -User $accountName

Refreshing form parts

$
0
0

When using form parts in AX 2012, you sometimes need to explicitly refresh their data based on an event in the main form. It may not be completely obvious how to do it, but it’s not too complicated in the end.

Form parts are actually forms by themselves and if you know how to manipulate forms at runtime, you know how to work with parts too. The tricky part it getting a reference to a form part.

One of possible solutions is adding the following method to SysSetupFormRun class (so it’s available to all forms):

public FormRun getFormPartByName(str _name)
{
    PartList partList = new PartList(this);
    FormRun part;
    int i;
 
    for(i = 1; i <= partList.partCount(); i++)
    {
        part = partList.getPartById(i);
 
        if (part.name() == _name)
        {
            return part;
        }
    }
    return null;
}

As you see, it iterates all parts in the form and finds a part with the given name.

Then you can call it from your form to get a reference to a particular part and do anything you like with it, such as refreshing the data:

public void refreshMyFactBox()
{
    SysSetupFormRun formRun = this as SysSetupFormRun;
    FormRun factBox = formRun.getFormPartByName('MyInfoPart'));
 
    if (factBox)
    {
        factBox.dataSource().research();
    }
}

Note that if it’s a form part, you have to provide the name of the underlying form, such as:

FormRun factBox = formRun.getFormPartByName(formStr(MyFormPartForm));

X++ to CIL: Object must implement IConvertible

$
0
0

Somebody asked in Dynamics User Group forum about an error thrown by RetailCommonWebAPI running in a batch in AX 2012 (RetailCommonWebAPI in batch mode). I don’t want to discuss that particular problem here, but I want to show the underlying cause, because it’s actually quite tricky.

What I’m discussing below is related to CIL generated from X++, therefore if you want to try the sample code, make sure that you run it in CIL. It doesn’t require running in batch.

Let’s start with a simple piece of X++ code. It creates a Hashtable (using .NET Interop) and passes it to the constructor of another hash table. (I don’t bother adding any data to the hash table, because it’s not necessary for the demonstration.) This code works without any problem.

System.Collections.Hashtable t1 = new System.Collections.Hashtable();
System.Collections.Hashtable t2 = new System.Collections.Hashtable(t1);

Now let’s change a single thing – the type of the first variable will be defined as CLRObject instead of Hashtable. Note that the content of the variable is exactly the same as before.

CLRObject t1 = new System.Collections.Hashtable();
System.Collections.Hashtable t2 = new System.Collections.Hashtable(t1);

If you run this code (in CIL), you’ll get an error:

System.InvalidCastException: Object must implement IConvertible.
   at System.Convert.ChangeType(Object value, Type conversionType, IFormatProvider provider)

It’s an interesting result. I would expect the call to fail, because there is no Hashtable’s constructor accepting an object (System.Object), but it’s not the reason. It’s referring to a call to Convert.ChangeType(), but where did it come from?

The answer can’t be found in X++; you have to look at the generated CIL code. This is what I got from the first snippet (after decompiling CIL to C#):

t2 = new Hashtable((IDictionary) t1);

Hashtable has two constructors accepting a single parameter: one takes capacity (int) and one takes elements in the form of a dictionary (such as a hash table). We want to use the latter and that’s exactly what happens.

Now look at CIL generated for the other snippet:

t2 = new Hashtable((int) Convert.ChangeType(t1, typeof(int)));

This is unexpected and incorrect code. The generator of CIL from X++ somehow decided to use the constructor accepting int and it’s trying to convert t1 to int. It must fail, because there is no conversion from Hashtable to int. And even if it succeeded, we would get an empty Hashtable (which is not what we would want, if t1 contained some values).

If the CIL generator doesn’t know the underlying type, it shouldn’t try to guess it, because it’s likely to fail and we end up with weird and unpredictable errors. A compile-time failure would be a much safer approach.

Just for completeness, this is how CIL looks like if you declare the variable as System.Collections.IDictionary (as I suggested in the discussion forum):

t2 = new Hashtable(t1);

Because the type is exactly matching the expected type, there is neither type casting nor any conversion.

New X++ features in AX 7

$
0
0

X++ didn’t change much since I started to work with it eleven years ago, with a few exceptions such as event handlers in AX 2012.

That’s not true anymore in AX 7, because it comes with many new language constructs (and more are expected). If you’re familiar with modern object-oriented languages, and especially C#, you’ll find them very familiar, but some concepts will be completely new for many AX developers.

In general, X++ now utilizes many features supported by CIL and the syntax of new features closely follow C#, which is helpful for everyone who knows or is going to learn C#. To use the language correctly, you also have to be aware of some details of the runtime environment (CLR), such as how it handles garbage collection. You’ll find much more information written for C# developers than for X++ developers, therefore consider learning about common features from sources originally intended for C#.

Some new features help with implementation hiding and splitting the application to logical packages, which is really missing in AX these days (and AX7 isn’t the solution either, it’s just one more step in the right direction).

I’m not going to talk about every new feature, because you can already find that in AX7 wiki (Using X++ and debugger features) and mfp’s blog: (What is new in X++ in AX7?). Let me just mention a few things that I consider especially important or tricky.

Private member variables

This feature may not look very exciting, but is solves an important problem. Having all member variables protected (as in previous AX versions) means that any child class can access and change any variable defined in its parents. Classes often have member variables that they need for their own internal logic and that shouldn’t be exposed to anybody else.

Making variables private protects them from unexpected changes and it also make it easier for developers extending the class. For example, if a parent class has eight private fields and two protected, developers adding child classes have to about just two variables and not all ten. It’s obvious that the private ones aren’t intended for them.

Const and readonly

Const represents values that never change. It’s a simple concept, but it’s nice to have it in X++, instead of using variables (which doesn’t prevent changes) and macros (which don’t have type and are really ugly).

Readonly member variables are more interesting, because you can set their value when creating an object and they can’t change afterwards. It’s a common scenario but there was no way to enforce it in previous versions. It also allows you to create immutable objects.

Static member variables

Static fields (member variables) share certain values across all instances of a class. It’s useful in some cases, but it’s also very dangerous for several reasons. Please try to avoid them, especially if you don’t understand what these two points mean:

  • Static fields are often responsible for problems with memory allocation, when a static field refers to an object tree with a lot of data and the reference makes all these objects ineligible for garbage collection. If you have to make such a reference, weak references may help you in same cases.
  • If the field is used in more than a single thread, its value may change at any point (unless you introduce some type of locking). If you set a value to a static field a second ago, you still can’t be sure that some other thread didn’t already change it to something else. This may lead to bugs that are very difficult to reproduce. Multi-threading issues aren’t limited to static fields, but they’re common with them, because the same value is automatically shared by all threads.

Finally

Finally block can be used after try in a similar way as catch. Code inside finally executes regardless of whether code in try finished normally or it threw an exception. It’s usually used to clean up resources allocated in try block.

Note that it’s completely valid to use try/finally without any catch clause (because you have exception handling at some higher level or you simply can’t handle it in any way).

try
{
    throw error("It's broken!");
}
finally
{
    info("Let's clean up everything");
}

Using

This statement is in fact a shortcut for try/finally statement used for classes implementing IDisposable interface. It’s intended for releasing certain resources that CLR can’t manage automatically and that should be released as soon as possible (such as file handles). You want to be sure that regardless of happens (e.g. exception is thrown), you won’t leave a resource locked, memory allocated and so on. If the resource is wrapped in a class correctly implementing IDisposable and you instantiate the class with using, you’re safe.

You will meet the dispose pattern very often if you start using .NET types for streams, database queries and network communication, among others. Make sure that you correctly dispose all disposable objects, otherwise you can run out of database connections, for example. The using statement is here to make it easier for you.

Maybe you never needed anything like that before, but I think we’ll mix X++ and other .NET code much more often in AX 7, because it’s now so much easier, and therefore more developers will need this kind of knowledge.

Note that you technically can utilize using blocks for other purposes – all you need to implement IDisposable. The following example shows a custom class TimeMeasure used to measure how long does it take to execute code inside the using statement.

using (TimeMeasure m = new TimeMeasure())
{
    // Do something here
}

This is the implementation, which coincidentally shows several other new features in AX 7:

using System.Diagnostics;
 
class TimeMeasure implements System.IDisposable
{
    private Stopwatch stopwatch = Stopwatch::StartNew();
 
    public void Dispose()
    {
        stopwatch.Stop();
        info(stopwatch.Elapsed.ToString());
    }
}

The using block starts with creating an instance of the class, which initializes the member variable. And when the block ends, Dispose method is executed.

Please take it as a demonstration of how the statement works, not as an encouragement to misuse IDisposable on regular bases. This technique is useful in some cases, but they aren’t very common.

Notice that my code above uses using in another context: using System.Diagnostics. That’s a completely unrelated thing, they merely use the same keyword.

Extension methods

Extensions methods provide a way to pretend that you added an instance method to a class, table, view or map without actually changing it.

For example, let’s say that I want a method to convert a list to a set. I can’t change the List class (because it’s defined in AX kernel), but I can easily write a static method doing the conversion for me.

Set set = List_Extension::toSet(list);

It works, but it’s not easy to read and you have to know about the existence of List_Extension class. I would prefer to do this instead:

Set set = list.toSet();

And this is exactly what extension methods make possible.

To be considered an extension method, the method (and the class in which it’s defined) must meet certain criteria, which you can find on AX7 wiki. I’ll rather show you the actual implementation of toSet():

public static class List_Extension
{
    public static Set toSet(List _list)
    {
        //TODO: throw error is _list is null
 
        Set set = new Set(_list.typeId());
        ListEnumerator enumerator = _list.getEnumerator();
        while (enumerator.moveNext())
        {
            set.add(enumerator.current());
        }
 
        return set;
    }
}

Notice that it’s really just a static method that gets a list as its argument. It can’t access any non-public members as it could if it was an actual instance method added to the class.

Even if you have a class that you technically can change (unlike List in the example above), you still may want to use an extension method to avoid overlayering.

You don’t necessary have to create any extension method by yourself, but you must be at least aware of their existence. Otherwise you would wonder where certain methods come from.


These are really great additions to X++, aren’t they? And don’t forget that this is not an exhaustive list.

UtilElements in AX 7

$
0
0

In older versions of Dynamics AX, you can get information about AX application objects (metadata) through system “tables” such as UtilElements. This doesn’t work anymore in AX 7. These tables still exist, but they don’t have any data, therefore you have to migrate to another solution.

AX 7 comes with a rich framework for metadata, implemented in several assemblies in namespace Microsoft.Dynamics.AX.Metadata. But it’s too complex for simple tasks – you can make it much simpler by using MetadataSupport class. For example, the following piece of code iterates through all form names:

var forms = Microsoft.Dynamics.Ax.Xpp.MetadataSupport::FormNames();
while (forms.MoveNext())
{
    print forms.Current;
}

This is even easier than before!

File upload and download in AX 7

$
0
0

New Dynamics AX is a web application running in cloud, so how can users work with files in such an environment? The answer is: in the same way as with other web applications. If you know how to add and download attachments in your webmail client, you can do it in AX 7 as well.

And it’s not too difficult for developers either.

Let me demonstrate it on a simple form I’ve built.

FormLook

When you click the Upload button, a dialog opens where you can pick a file on your computer and upload it. It even shows progress of uploading.

Uploading

The whole upload is triggered by a single statement: File::GetFileFromUser(). You don’t have to deal with any details.

By default, the file is uploaded to a temporary blob storage and can be accessed through some ugly URL such as this:

Uploaded

If you click the download button, it will navigate to the URL and your browser will do the rest:

SaveFile

Code of Download button is again a one-liner: new Browser().navigate(fileUrl).

This is the complete code of the form, showing also how to get the URL of the uploaded file:

[Form]
public class UploadDownloadForm extends FormRun
{
    str fileUrl;
 
    [Control("Button")]
    class UploadButton
    {
        public void clicked()
        {
            FileUploadTemporaryStorageResult result = File::GetFileFromUser() as FileUploadTemporaryStorageResult;
            if (result && result.getUploadStatus())
            {
                fileUrl = result.getDownloadUrl();
                info(fileUrl);
            }
        }
    }
 
    [Control("Button")]
    class DownloadButton
    {
        public void clicked()
        {
            new Browser().navigate(fileUrl);
        }
    }
}

Your files typically aren’t accessible by URL, because they’re in database or in a secured storage. But that’s not a problem. Just load the content of your file to a stream and pass it to File::SendFileToUser(). It will put the file to the temporary blob storage and navigate to the URL, therefore users can download the file in the same way as above.


LCS on Azure Portal

$
0
0

I was really surprised when I noticed Dynamics Lifecycle Service on Azure Portal. I didn’t know that Microsoft even planned such a feature.

LCS_Azure

It shows projects, environments and so on defined in LCS. The tiles point back to the usual LCS portal.

It’s some kind of preview; let’s wait to see where it goes.

How to send emails from code in AX 7

$
0
0

There are many situations when you may want to send an e-mail from Dynamics AX. Let’s see what options we have.

First of all, you have to configure the environment. Go to System administration > Setup > Email > Email parameters (or simply search for email parameters in navigation search).

The first tab shows email providers. Simply put, email providers are classes that knows how to send emails. If you want to construct a message in code and send it to an SMTP server, you don’t need many different providers, but that’s not the only option. Maybe you want to use an Exchange server instead of SMTP. Or maybe you want to allow users to modify messages before sending.

There are two categories of providers: interactive and non-interactive. You have to choose one non-interactive provider to be used for sending directly from code – that’s done in Batch email provider field. Then you can enable and disable interactive providers. As you’ll see later, if more than one is enabled, the user can choose which to use.

ProvidersSetup

You may need extra configuration for providers, such as connection details to your Exchange server. To keep it simple, configure just the SMTP server on the SMTP settings tab. If you don’t have / don’t want to use any real SMTP server, you can use development tools such as smtp4dev (as I did).

SMTPSetup

With the setup ready, let’s look at some code. You can create a runnable class to test it.

First of all, you have to build a message. It’s an object containing the subject, the body, recipients and so on. We have the message builder class to help:

var builder = new SysMailerMessageBuilder();
 
builder.setFrom("robot@contoso.com");
builder.addTo("primus@contoso.com");
builder.addTo("helena@contoso.com");
builder.setSubject("Test");
builder.setBody("Test email");

If you prefer, you can use a more succinct syntax, because the builder offers a fluent interface:

var builder = new SysMailerMessageBuilder()
    .setFrom("robot@contoso.com")
    .addTo("primus@contoso.com")
    .addTo("helena@contoso.com")
    .setSubject("Test")
    .setBody("Test email");

You can combine these two approaches at will – it’s no magic, just a few methods returning objects.

When you’ve configured the builder, let it actually build the message:

var message = builder.getMessage();

What it returns is an instance of System.Net.Mail.MailMessage class, but it isn’t really necessary to know. The var keyword helps us to hide such a detail.

The last step is getting a mailer and sending the message out. Try the non-interactive mailer first:

SysMailerFactory::getNonInteractiveMailer().sendNonInteractive(message);

If I run the code, my smtp4dev successfully receives the mail.

smtp4dev

Now let’s try an interactive mailer.

SysMailerFactory::getInteractiveMailer().sendInteractive(message);

Notice that the syntax is very similar to what we did with the non-interactive mailer, and that the message is still constructed in exactly the same way, therefore you don’t have to learn almost anything new.

If you run the code, AX realizes that there are several enabled providers, therefore it let you choose:

InteractiveSelection

What happens next obviously depends on the provider. If you pick the AX email client, you’ll get this form:

NativeEditor

When you click Send, it will send the email via SMTP (and you can see it in your inbox, in smtp4dev or so).

You can also build your own providers, if needed. You just have to create a class and implement SysIMailerInteractive interface, SysIMailerNonInteractive interface or both.

I don’t want to go to details here, nevertheless you can look at my dummy interactive provider to see that you don’t really need much boilerplate code.

using System.ComponentModel.Composition;
 
#define.SysMailerMyOwn_ID('MyOwn')
 
[ExportAttribute(identifierStr(Dynamics.AX.Application.SysIMailer)),
 ExportMetadataAttribute(extendedTypeStr(SysMailerId), #SysMailerMyOwn_ID)]
public class MyOwnEmailProvider implements SysIMailerInteractive
{        
    public SysMailerDescription getDescription()
    {
        return "My Own Email Provider";
    }
 
    public SysMailerId getId()
    {
        return #SysMailerMyOwn_ID;
    }
 
    public boolean sendInteractive(System.Net.Mail.MailMessage _message)
    {
        info("Forget it. They wouldn't read it anyway.");   
        return true;
    }
}

You don’t have to register the provider in any way – the pluggable architecture in AX and the Managed Extensibility Framework will handle that. Just build your project, start AX and use your new provider.

MyOwnProvider

If you want to review implementation of standard providers, the classes are called SysMailerSMTP, SysMailerExchange and SysMailerEML.

Several people already asked about sending emails from code in AX 7. I hope this blog post will answer the most common questions.

Code snippets in AX 7 – Introduction

$
0
0

Code snippets, in general, are small pieces of code that often can’t be used separately, but they’re rather intended to be integrated in a larger solution. Visual Studio offers several features for working with snippets, and because Dynamics AX development is now done completely in Visual Studio, X++ developers can use them too.

Let’s start with something trivial. Open X++ code editor (e.g. create a runnable class), open context menu (right click) there and select Insert Snippet. Notice the keyboard shortcut (Ctrl+K and then X); it’s very handy if you use snippets more often.

menu insert snippet

You’ll get a list of available snippets. Choose ctor (constructor) for now:

constructor selection

This inserts source code for a constructor at current cursor position.

constructor result

Although pasting a static piece of code can be useful, it’s not very exciting. Let’s look at the For snippet instead:

for selection

For now, put the snippet directly to the class definition, not inside a method. There is a certain problem that could lead to incorrect behavior – it’s explained in detail in a separate post.

This will create a for loop, but that’s not all. Notice that there is i variable, used at three places, and that the first occurrence is selected:

for result

You can immediately start typing and change the name; press Tab when you’re done. All three occurrences of i change to the new name and the cursor moves to the next place that you likely want to change – the condition.

for counter

This is really helpful – you don’t have to manually change the same thing several times and you’re navigated directly to those places you should change, ignoring static parts. Also don’t forget that this is just a simple demonstration – you can use the same approach for much more complex scenarios.

Another thing you can do is to put a snippet “around” a selected piece of code. For example, let’s say that I’ve just realized that I need exception handling for my code. I select the code and choose Surround With from the context menu:

surround with

Then I pick the try snippet, which puts my code into a try block and I can immediately start writing my exception handling logic.

try catch

We have editor scripts in MorphX IDE, but they aren’t as easy to use as they should be. Code snippets in Visual Studio are a welcomed, powerful improvement.

Code snippets in AX 7 – The Problem

$
0
0

In the previous blog post, I demonstrated how to use several code snippets in Visual Studio. I also mentioned that there is a problem – here I’m going to look at it more closely.

Let me introduce yet another snippet, just to make it a little bit more interesting.

propfull selection

propfull is modeled on a snippet of the same in C#, where it creates a property with a backing field (member variable). Because X++ doesn’t have properties, it creates an accessor method instead.

This is the expected behaviour, when you can replace the data type (int by default), the variable name (myVar) and the method name (MyProperty).

propfull result correct

But it doesn’t always work. In some cases, you get only static code and you would have to replace all values by hand (three occurrences of the type, three of the variable name, one method name).

propfull result wrong

This is clearly wrong and renders the snippet much less valuable.

The obvious question is why it works in some cases and it doesn’t in other situations. It took me a while to spot it, nevertheless it seems that I’ve finally found the cause.

The snippet works (you get the option to replace placeholders) if the editor doesn’t try to indent it.

Here are a several examples of what I mean.

Example 1:

I insert propfull snippet at the beginning of the line.

1a

What I get is nicely indented code, but it’s static, without the option to replace literals.

1b

Example 2:

Now I do same, but I do it with the cursor indented with four spaces.

2a

Voilà, now literals work.

2b

I believe it’s because the starting point was already indented.

Example 3:

Just to prove the point, let’s try indention with eight spaces.

3a

As expected, code is indented but static.

3b

Example 4:

The snippet also works if I use it in an invalid context.

4a

The following code doesn’t even compile, but replacements work as expected.

4b

I think that the editor doesn’t bother to indent code, because it has no idea how to deal with code that doesn’t make sense.

Example 5

Speaking of invalid contexts, let’s try to put a for loop directly inside a class declaration.

5a

Replacements work.

5b

It might look like that editor actually did some indentation, but it’s not the case. It merely copied the definition of the snippet, which in this case includes some spaces.

Example 6

If we insert the snippet at the right place including indentation, it works.

6a

6b

Example 7

As expected, using the snippet with different indentation results in indented code without replacements.

7a

7b

Example 8

I mentioned that the editor doesn’t indent invalid code. If I do exactly the same as in the previous example, but my definition of For snippet has an error, the result is different.

8a

The code doesn’t compile because of the extra hash character (#). Unlike in Example 7, not it’s not indented correctly but replacement works.

8b

I hope this sufficiently explains when replacements in snippets work and when they don’t. In short, I believe that what’s responsible is the feature indenting code in the editor. I didn’t discuss in detail when exactly code indentation kicks in – it’s a bit a more complex than demonstrated above and I don’t know exact rules, but I think this is good enough to give you an idea.

It should help Microsoft to reproduce and fix the problem and I hope it will happen soon, because this issue makes snippets confusing and less useful. Code snippets are extremely helpful and every developer should use them and become more productive. Having such an issue doesn’t help the adoption.

This explanation should also help you to use snippets even before the problem is fixed. Without understanding why it works only in some cases, using snippets can be frustrating. It should be a bit easier with this knowledge.

Custom code snippets in AX 7

$
0
0

I already explained how to use code snippets and a problem you might run into, but what if you want some additional snippets?

The good news is that you can easily build new snippets by yourself. Let’s use a concrete example.

Let’s say that you often write queries with the query framework and execute them with QueryRun and you’re tired of writing the boilerplate code. A snippet would help.

First of all, create a text file and name it queryRun.snippet. Then fill it with the following content:

<?xml version="1.0" encoding="utf-8"?>
<CodeSnippets xmlns="http://schemas.microsoft.com/VisualStudio/2005/CodeSnippet">
  <CodeSnippet Format="1.0.0">
    <Header>
      <Title>queryRun</Title>
      <Description>Creates a query with a single table, executes in and fetches records.</Description>
      <SnippetTypes>
        <SnippetType>Expansion</SnippetType>
      </SnippetTypes>
    </Header>
    <Snippet>
      <Declarations>
        <Literal Editable="true">
          <ID>table</ID>
          <ToolTip>Table name</ToolTip>
          <Default>MyTable</Default>
        </Literal>
        <Literal Editable="true">
          <ID>buffer</ID>
          <ToolTip>Table variable name</ToolTip>
          <Default>myTable</Default>
        </Literal>
      </Declarations>
      <Code Language="X++"><![CDATA[Query query = new Query();
QueryBuildDataSource qbds = query.addDataSource(tableNum($table$));
QueryRun queryRun;
$table$ $buffer$;
 
queryRun = new QueryRun(query);
while (queryRun.next())
{
    $buffer$ = queryRun.get(tableNum($table$));$end$
}]]></Code>
    </Snippet>
  </CodeSnippet>
</CodeSnippets>

In short, the header describes the snippet and can provide additional information. Literals define places that can be modified after putting the snippet into code editor, such as the name of the table. The code structure will be the same in all cases, but you’ll likely want to use various tables, therefore the table name is a good candidate for a literal.

The last section, Code, contains the actual source code. Literals are represented by their IDs surrounded by dollar signs (by default).

You can learn more about the syntax in Code Snippets Schema Reference.

When you have your snippet ready, open Visual Studio, go to Tools > Code Snippet Manager, change Language to X++ and click Import.

Import snippet

Select the snippet file and put it into Snippets folder.

Import snippet location

Confirm dialogs and look at snippets in code editor – you should see your new queryRun there:

queryRun selection

Use the snippet and you should get the following code, where you’ll set the table type and the name of the variable.

queryRunResult

Note that the problem with replacements applies here, therefore you have to be careful where you use the snippet. It seems that the while loop inside the snippet triggers code indentation (although I haven’t investigated it in detail), therefore you should use the snippet in some invalid context, such as directly in class declaration or in a method with a compilation error. This workaround won’t be needed in future, after the bug gets fixed.

After typing in just two words (names of the table and the variable), you have a simple query ready to run and you can focus on your actual business logic:

query worker

Another note: If you follow this particular example with worker, you’ll notice that when you type worker and press Tab, code completion kicks in and replaces worker with WorkerSessionType. To get the intended result, you have to press Esc instead of Tab.

When you write code, think about what you do often and consider turning it into a snippet, so you don’t have to write it by hand again. You also don’t have to build snippets just for yourself – you can share them with your team or even the whole world.

Editor scripts in MorphX allow any arbitrary code, which clearly isn’t the goal of code snippets in Visual Studio. But it doesn’t mean that you can’t do that – if you need something more complex, such as generating a whole class based on input from a dialog, you can create a Visual Studio extension.

Fonts and colors in Visual Studio

$
0
0

Moving Dynamics AX development to Visual Studio gave us a state-of-art IDE with many features and configuration options. For instance, you can modify fonts, font sizes and color to match your preference and to help to overcome certain visual impairments.

These options are available from Options > Environment > Fonts and Colors. You can configure many things there, such changing colors of the Output Window or setting Environment Font to Snap ITC (try it :-)), nevertheless let’s look at Text Editor right now.

GeneralOptions

There are some generic options, such as the background color, and then some language-specific settings. This includes X++, therefore you can customize, for example, how overlayered code is displayed in code editor.

XppOptions

Personally I haven’t changed any of these setting for X++, but it’s good to know about them.

Label ID fix

$
0
0

I recently saw an interesting problem with labels in AX 2012 – two customizations created different labels with the same IDs, therefore the newer won and the older one showed completely wrong texts in GUI.

For example, one customization created a form with caption @XYZ1 = “Customers”. Another customization created a label with the same ID, @XYZ1, with text “This is an error” and used the label for an error message. The latter change effective replaced the text of @XYZ1 from “Customers” to “This is an error” and therefore the form caption becomes a nonsense.

The cause (I believe) was that two developers used different primary language when putting code to TFS and not all labels existed in all languages. Anyway, the main question was how to fix it.

There is no way how @XYZ1 could mean both “Customers” and “This is an error” at the same time, therefore it was necessary to create a new label for one of the cases and update all code using the label. And repeat it for more than a hundred times.

I didn’t know how difficult it would be to automate it – fortunately I found it rather easy. First of all, I extracted original labels from an older version of the .ald (version control systems can’t prevent all problems, but at least you have all data so you can recover from failures). Then I parsed this list of labels to objects containing label ID, label text and description. (Note that I didn’t have to deal with translations in this case.) You can see it in getParsedLines() method below.

Next step was to create a new label ID for the given text and description and maintain a mapping between the old and the new label ID.

Finally, I used some existing methods to replace original labels IDs with new ones in code and properties. This was potentially the most complicated part, but it turned out to be a piece of cake. :-)

I also had to identify and checked out all objects where labels should have been be replaced, because the replacement works only with checked-out objects. It wasn’t too difficult thanks to version control; I simply took all objects included in the original changeset.

The complete code is below; maybe somebody will run into a similar problem and will find this useful.

class DevLabelFix
{
    private List getParsedLines()
    {
        str fileName = @'D:\oldLabelsFromTFS.txt';
        System.Collections.IEnumerable lines;
        System.Collections.IEnumerator enumerator;
        str line;
        DevLabelDef labelDef;
        List parsedLines = new List(Types::Class);
        int spacePos;
 
        try
        {
            lines = System.IO.File::ReadAllLines(fileName);
            enumerator = lines.GetEnumerator();
 
            while (enumerator.MoveNext())
            {
                line = enumerator.get_Current();
 
                if (strStartsWith(line, '@'))
                {
                    labelDef = new DevLabelDef();
 
                    spacePos = strFind(line, ' ', 1, 10);
                    labelDef.parmId(subStr(line, 0, spacePos-1));
                    labelDef.parmLabel(subStr(line, spacePos+1, strLen(line)));
                    parsedLines.addEnd(labelDef);
                }
                else if (line != '')
                {
                    Debug::assert(labelDef != null);
                    labelDef.parmDescription(line);
                }
            }
        }
        catch (Exception::CLRError)
        {
            throw error(AifUtil::getClrErrorMessage());
        }
 
        return parsedLines;
    }
 
    public void run()
    {
        ListEnumerator enumerator = this.getParsedLines().getEnumerator();
        DevLabelDef labelDef;
        SysLabelEdit sysLabelEdit = new SysLabelEdit();
        str newLabelId;
        Map labelMap = new Map(Types::String, Types::String);
 
        while (enumerator.moveNext())
        {
            labelDef = enumerator.current();
 
            newLabelId = sysLabelEdit.labelInsert(  'en-us',
                                                    labelDef.parmLabel(),
                                                    labelDef.parmDescription(),
                                                    SysLabelApplModule::None,
                                                    'XYZ');
            info(strFmt("%1|%2", labelDef.parmId(), newLabelId));
 
            labelMap.insert(labelDef.parmId(), newLabelId);
        }
 
        // These methods are normally private; I made them temporarily public to allow these calls.
        SysLabelFile::preCheckInUpdateAllPendingFiles(labelMap);
        SysLabelFile::preCheckInUpdateAOTElementsClient(labelMap);
    }
 
    public static void main(Args args)
    {
        new DevLabelFix().run();
    }
}
 
// The DevLabelDef class merely holds ID, label text and description together.
class DevLabelDef
{
    str id;
    str label;
    str description;
 
    public str parmDescription(str _description = description)
    {
        description = _description;
        return description;
    }
 
    public str parmId(str _id = id)
    {
        id = _id;
        return id;
    }
 
    public str parmLabel(str _label = label)
    {
        label = _label;
        return label;
    }
}

Class extensions

$
0
0

The new Dynamics AX (AX 7) attempts to minimize overlayering (“customization”) and promote extensions, which allow adding functionality without modifying source code of the original object. For example, you now can attach a field to a table without changing the definition of the table itself. It has many benefits – no changes in existing objects mean no code conflicts and much easier upgrades, it’s not necessary to recompile the original object and so on.

AX 7 RTW introduced extension methods – if you’re not familiar with them, look at my description and an example in New X++ features in AX 7. In short, extension methods are static method defined in a completely different class, yet they can be called in the same way at if they were instance methods of the “extended” class, table or so.

Update 1 added something called class extensions, which allows adding not only methods, but also class variables, both instance and static, constructors and static methods.

For example, the following piece of code augments the standard Dialog class with a variable and methods working with the variable:

[ExtensionOf(classStr(Dialog))]
final class MyDialog_Extension
{
    private int x;
 
    public void setX(int _x)
    {
        x = _x;
    }
 
    public int getX()
    {
        return x;
    }
}

You can use these methods directly on the Dialog class:

Dialog d = new Dialog();
d.setX(50);  
int x = d.getX();

As you would expect, the value set by setX() is stored in the variable and you can retrieve it by calling getX().

But how does it really work? How Dialog class knows about these new methods and where is the value actually stored, if it’s all defined in a completely different class?

You might think that MyDialog_Extension inherits from Dialog and replaces the Dialog class, it’s a partial class or something like that, but it’s not the case.

The methods are actually extension methods as we know them from AX 7 RTW. Don’t get confused by the fact that we declare them as instance methods; they’re converted to normal static extension methods under the hood. For example:

// This instance method in the extension class…
public void setX(int _x) {}
 
// …is converted to a static extension method like this:
public static void setX(Dialog _dialog, int _x) {}
// As usual, the first argument is object to which the extension methods applies.

The conversion happens when X++ is compiled to CIL and you normally don’t have to bother about it; I’m mentioning it to demonstrate that it’s really just a normal extension method.

Generating different CIL than what you see in X++ might look weird, but it’s a common way to extend CLI (“.NET”) languages without changing the Common Language Runtime (CLR). For example, if you use async keyword in C#, C# compiler uses standard CLR constructs to generate a whole state machine that handles asynchronous processing. Because CLR receives normal CIL code, it doesn’t need to know anything about X++ class extensions nor C# async/await.

All right, so methods in class extensions are just common extension methods, which explains how methods are “attached” to the augmented class. But where AX stores the variables? How can static methods of the extension class access instance variables?

Again, the solution isn’t too complicated. Under the hood, the extension class has a static variable which maintains references between instances of the augmented class and instances of the extension class. In my case, it maps instances of Dialog and MyDialog_Extension.

When I call a method of my MyDialog_Extension, it gets a Dialog instance as the first argument. It looks into the static map, obtains the corresponding MyDialog_Extension instance (it might have to create it first if it doesn’t yet exist) and then it accesses its fields.

The following code is a simplified demonstration of how it works.

// A demonstration - not the real implementation
final class MyDialog_Extension
{
    private int x;
    private static Map mapDialogToExtension;
 
    public static void setX(Dialog _dialog, int _x)
    {
        MyDialog_Extension extension = mapDialogToExtension.lookup(_dialog);
        if (!extension)
        {
            extension = new MyDialog_Extension();
            mapDialogToExtension.insert(dialog, extension);
        }
        // Here we're accessing the instance variable
        extension.x = _x;
    }
}

Now it’s clear that extension classes don’t modify their augmented classes in any way. All variables declared in an extension class are stored in its instances – it’s rather similar to joining two separate tables.

Because extension classes merely get instances of augmented classes by references, they can’t access its internal state or call private methods.

You can also attach static methods and class fields (variables and constants).

Using static methods in class extensions is useful because it’s easier to find static methods on the corresponding class rather in some utility classes. It also allows you to add methods to the Global class and call them without specifying any class name.

Using static fields can also be very useful. The following example shows adding a new operator (implemented as a public constant) to DimensionCriteriaOperators class.

[ExtensionOf(classStr(DimensionCriteriaOperators))]
final static class MyDimOperators_Extension
{        
    public const str MyNewOperator = '!';
}

As with methods, the new constant seems to be a part of the augmented class, although it’s declared somewhere else.

ExtensionPublicConst

In some cases, such a static class with public constants can be a natural replacement of extensible enums.

If you use a static method or a static variable, CIL generated by X++ compiler directly refers to the extension class.  For example, DimensionCriteriaOperators::MyNewOperator is translated to exactly the same CIL code as MyDimOperators_Extension::MyNewOperator. The fact that X++ presents it in a different way is purely for developers’ convenience.

As you see, class extensions are really an evolution of extension methods. Instance methods in class extensions are based on extension methods; they “merely” add a the option to work with instance variables. And there a few other useful features, namely constructors and static members.

The main purpose of class extensions is to help with getting rid of overlayering, but that’s not the only use. They have potential to change how we traditionally design certain things in AX, especially if somebody comes with a common framework based on extensions, as LINQ revolutionized how we work with collections in C#.

For example, are you aware of that you can write extension methods working with all table buffers by extending Common? Like this:

[ExtensionOf(tableStr(Common))]
final class Common_Extension
{
    public List getSelectedRecords()
    {
        List selectedRecs = new List(Types::Record);
 
        if (this.isFormDataSource())
        {
            MultiSelectionHelper helper = MultiSelectionHelper::construct();
            helper.parmDatasource(this.dataSource());
 
            Common rec = helper.getFirst();
            while (rec)
            {
                selectedRecs.addEnd(rec);
                rec = helper.getNext();
            }
        }
        return selectedRecs;
    }
}

The possibilities are unlimited.

I hope I didn’t overwhelm you with technical details – it may be challenging especially if you’re not familiar with C#, where we use things like static members and extension methods for years. But I believe that understanding the inner workings is often very helpful for using language features correctly and debugging code if it doesn’t work as expected.

Expression builder in AX 7

$
0
0

If you want to allow users configure certain conditions by themselves, considering using the Expression Builder control.

This is how it looks like:

simpleexpression

It exists already in AX 2012, where you can add it through the ManagedHost control. AX 7 doesn’t support managed controls anymore, but the Expression Builder has been redesigned and it’s now available as a native AX control.

Add control

The control allows you to add and remove conditions and combine them with AND and OR operators.

You can select fields, possibly from several tables.

fields

Then you choose an operator – which operators are available depends on field’s data type.

stringoperators

And finally you select a value. It will give you a lookup for available values, if applicable.

Some data types are handled in a special way.  For instance, fields with data types extending Money gets an additional field for currency, and the amount is converted to the right currency for comparison at runtime.

numwcurrency

Dealing with dates is even more complex. You can either pick a fixed date:

fixeddate

or define a date relatively to the current date or the current month:

relativedate

In addition, Expression Builder understands surrogate keys, expands financial dimension fields to individual dimensions and has a support for hierarchies.

If you want to see an example in the standard AX application, look at Organization administration > Workflow > Work item queue assignment rules.

A bit of technical details

To be able to use your own tables in Expression Builder, you have to define an AOT query (that’s where fields are taken from) and a class (“document”) inhering from WorkflowDocument.

If you want to add Expression Builder to your own form, you have to add a little bit of code, most importantly to indicate which document class (and – indirectly – which query) it will use. Expression Builder has ExpressionDocumentClass() method for that. Then you also need some logic for loading and saving expressions – look at an existing implementation for details.

The document class can have a few useful attributes and it can also define calculated values, which are then displayed in the list among normal fields. Calculated fields are important – not only they allow you to do any kind of calculation, but you can also use them to work around limitations of what expression you can write.

Consider this scenario: You want to define a condition for ShippingDate > Deadline. How can you put the Deadline field on the right side of an expression in expression builder? You can’t (or at least I haven’t figured out how), but you can create a calculated field, such as DaysToShipDeadline, defined as Deadline – ShippingDate. Then it’s trivial to configure the condition as DaysToShipDeadline < 0.

When your expression is defined and saved, you can call Expression::evaluate() to see if the condition it true or false for a given record:

ExpressionResultType result = Expression::evaluate(
    'usmf',            // Company
    tableNum(MyTable), // Table where is the record to check
    5637144576,        // ID of a record in MyTable
    expressionId,      // From ExpressionTable
   ExpressionDataSources::newExpressionDataSources());

This indicates a problem with how conditions are evaluated. Because you always provide only TableId and RecId, the evaluation logic must always make a query to database. If you need to run it once, it’s not a big deal, but if you’re evaluation many expressions, it may become a problem. To make it worse, methods for computed fields and the currency convertor also get only TableId and RecId, making additional DB queries. Caching helps a bit, but it’s still all quite expensive. I consider making a child expression class accepting a temporary buffer (or buffers) instead of just a record ID; the first prototype suggests it’s feasible and worth the effort.

If you’re interested in inner workings of the evaluation, let me give you a brief overview:

  • AX executes the query defined in the document class, filtered by RecId provided by the caller.
  • Data returned by the query (plus calculated values) are put into a XML document.
  • When you save your rule in Expression Builder, the condition is converted to an XPath query and saved to ExpressionTable.XPathQuery field. For evaluation, AX simply runs the XPath query against the XML document and returns the result.
  • XPath syntax there has a few extra functions, such as ConvertAmountValue() calling X++ class ExpressionCurrencyDefaultProvider.

If you want more details, you can look at source code, because most of it is available to you.

  • Expression Builder control is built in the same way that you can use to build your own controls. The runtime class is SysExpressionBuilderControl, its HTML code is in SysExpressionBuilderControlHTM resource, and so on.
  • A lot of logic of logic regarding saving and loading expressions is directly on ExpressionTable table. saveExpression() is a good example.
  • The evaluation is done mainly in SysExpression class (which unfortunately isn’t designed to be easily extensible).

Some logic is also contained in Microsoft.Dynamics.AX.Framework.Model.dll.

It looks useful, doesn’t it?

Application Explorer filtering

$
0
0

Application Explorer in AX 7 allows easy filtering, which is extremely useful, because trying to locate something in AOT is what we do all the time (I really missed this feature for many years). It looks simple, but it’s very powerful, if you know how to use it.

First of all, you can simply put a string in the search box on the top of Application Explorer and press enter. In AOT, it will show only elements with names containing the given string.

trivial

You can also click the little drop-down arrow on the right and choose additional filtering options, such as filtering by element type or model name.

filteroptions

Using filtering by type:”form”, I’m now getting only forms with names containing ListPage.

filterbytype

But what if you need some more advanced filtering, such as you want to find elements with names ending with a given text? Here is where it starts to be interesting. You can actually use regular expressions for filtering, therefore you can easily easily achieve that with ListPage$.

The dollar sign means the end of the string, therefore only names that satisfy this patter are those containing ListPage immediately followed by the end of the string.

Here is my result:

endswith

Similarly, you can use ^ character to match the beginning of a string. If you use them together to create a pattern like ^ListPage$, it will find only elements that are called ListPage. No characters before or after ListPage are allowed.

Only a single element satisfy this patter: the ListPage class.

exactname

We don’t have to stop there. What if you’re looking for a form with name starting with Cust and ending with ListPage, with any number of characters in between? Here we go:

complexexp

The dot means that there may be any character and * means that there may be any number of such characters.

In most cases, this is all you need to know about regular expressions to compose really powerful filtering patterns. It’s surely no problem for any software developer.

But regular expressions offer much more, if needed. Just to give you one more example, you might want to look for element names ending with numbers, such as Class1. Simple \d$ pattern will do the job.

endswithnumber

When writing more complicated regular expressions, you may find Quick Reference on MSDN very helpful.

I said that I missed this feature for many years and indeed, I now use it all the time. I simply love it!

New metadata API

$
0
0

AX 7 (“Microsoft Dynamics 365 for Operations”) offers a new API for getting metadata of AX elements such as tables, form extensions, models and so on. It’s very easy to use, therefore even if you’re very familiar with the old TreeNode API, you should definitely pay attention to this new one.

The best place to start is in the MetadataSupport class in Microsoft.Dynamics.Ax.Xpp namespace (yes, the whole API is in an external library; it’s not written in X++).

The class offers many static methods providing information about elements. Taking tables as an example, you can use:

  • TableNames() to get a list of names of all tables in Dynamics AX.
  • GetAllTables() to get details of all tables as objects.
  • GetTable() to get details of an individual table (based on its name or ID).

The MetadataSupport class also offers a few helper methods such as IsTableMapped() and ConvertAxUserTypeToBaseType().

Element details are represented by classes with names prefixed with Ax. For example, GetTable() returns an instance of AxTable class. (All these classes are defined in another assembly; the namespace is Microsoft.Dynamics.AX.Metadata.MetaModel).

These classes provide all details you may need. For tables, you can see properties, fields, indexes, methods and everything else.

AxTable members

Let me give you a full example that you can take and run in your environment. It iterates all controls in a given form and put their names to infolog.

using Microsoft.Dynamics.AX.Metadata.MetaModel;
 
class MetadataDemo
{        
    public static void main(Args _args)
    {        
        AxForm form = Microsoft.Dynamics.Ax.Xpp.MetadataSupport::GetForm(formStr(SysUserSetup));
        new MetadataDemo().showControlNames(form.Design);
    }
 
    private void showControlNames(IFormControlCollection _control)
    {
        var controlEnumerator = _control.Controls.GetEnumerator();
 
        while (controlEnumerator.MoveNext())
        {
            AxFormControl control = controlEnumerator.Current;
            if (control is IFormControlCollection)
            {
                this.showControlNames(control as IFormControlCollection); // Recursion
            }
            else
            {
                info(control.Name);
            }
        }
    }
 
}

There are a few things to notice:

  • It starts with using Microsoft.Dynamics.AX.Metadata.MetaModel, so we don’t have to repeat this namespace when referring to classes such as AxFormControl.
    I didn’t bother to do the same with Microsoft.Dynamics.Ax.Xpp, because I’m referring to it just once.
  • I use IFormControlCollection interface instead of concrete classes when I need to work with something containing child controls. This also me to use the same code for the Design node as well as for container controls such as tab pages, because they all implement this interface. Such interfaces are extremely useful for writing generic code and fortunately they’re used quite a lot in this framework.
  • Notice that AX 7 allows us to use property names directly (e.g. form.Design), so we don’t have to resort to the underlying accessor methods (e.g. form.get_Design()) as in previous versions . It makes programming easier and code nicer.
  • As a side note, notice the comment pointing out the recursive call. I tend to always do that, to make the use of reflection immediately obvious.

I truly enjoy working with this new metadata API – it’s nicely designed and easy to use. The only problem might be that you need to be a bit familiar with .NET Interop (= accessing .NET objects from X++), but even if you aren’t, you’ll quickly learn those few things you need.

Installing deployable packages with Powershell

$
0
0

Installing deployable packages to an AX 7 environment can often be done just by a few clicks on LCS (as described in Apply a deployable package on a Microsoft Dynamics 365 for Operations system). Unfortunately the situation isn’t always that simple and you may have to install the package manually, using the process explained in Install a deployable package. It consists of quite a few manual steps and where there are repeated manual steps, one should always consider automation.

I’ve built a few Powershell functions to help with these tasks:

#region Parameters
$folder = 'C:\Temp'
$archiveFileName = 'Updates.zip'
$runbookId = 'MyRunbook1'
$ErrorActionPreference = 'Stop'
#endregion
 
#region Derived values
$file = Join-Path $folder $archiveFileName
$runbookFile = Join-Path $folder "$runbookId.xml"
$extracted = Join-Path $folder ([System.IO.Path]::GetFileNameWithoutExtension($archiveFileName))
$topologyFile = Join-Path $extracted 'DefaultTopologyData.xml'
$updateInstaller = Join-Path $extracted 'AXUpdateInstaller.exe'
#endregion
 
Function ExtractFiles
{
    Unblock-File $file
    Expand-Archive -LiteralPath $file -Destination $extracted
}
 
Function SetTopologyData
{
    [xml]$xml = Get-Content $topologyFile
    $machine = $xml.TopologyData.MachineList.Machine
 
    # Set computer name
    $machine.Name = $env:computername
 
    #Set service models
    $serviceModelList = $machine.ServiceModelList
    $serviceModelList.RemoveAll()
 
    $instalInfoDll = Join-Path $extracted 'Microsoft.Dynamics.AX.AXInstallationInfo.dll'
    [void][System.Reflection.Assembly]::LoadFile($instalInfoDll)
 
    $models = [Microsoft.Dynamics.AX.AXInstallationInfo.AXInstallationInfo]::GetInstalledServiceModel()
    foreach ($name in $models.Name)
    {
        $element = $xml.CreateElement('string')
        $element.InnerText = $name
        $serviceModelList.AppendChild($element)
    }
 
    $xml.Save($topologyFile)
}
 
Function GenerateRunbook
{
    $serviceModelFile = Join-Path $extracted 'DefaultServiceModelData.xml'
    & $updateInstaller generate "-runbookId=$runbookId" "-topologyFile=$topologyFile" "-serviceModelFile=$serviceModelFile" "-runbookFile=$runbookFile"
}
 
Function ImportRunbook
{
    & $updateInstaller import "-runbookfile=$runbookFile"
}
 
Function ExecuteRunbook
{
    & $updateInstaller execute "-runbookId=$runbookId"
}
 
Function RerunRunbook([int] $step)
{
    & $updateInstaller execute "-runbookId=$runbookId" "-rerunstep=$step"
}
 
Function SetStepComplete([int] $step)
{
    & $updateInstaller execute "-runbookId=$runbookId" "-setstepcomplete=$step"
}
 
Function ExportRunbook
{
    & $updateInstaller export "-runbookId=$runbookId" "-runbookfile=$runbookFile"
}

When you set parameters (such as the name of your package file) and run the script, you can then execute whole process by the following list of function calls:

ExtractFiles
SetTopologyData
GenerateRunbook
ImportRunbook
ExecuteRunbook

If needed, you can also use RerunRunbook and SetStepComplete (e.g. SetStepComplete 10).

Note that SetTopologyData takes data just from the current machine, but you can borrow the code and modify it, if you need something more sophisticated.

This should make things a bit easier and reduce unnecessary errors such as mistyped runbook IDs.

Viewing all 117 articles
Browse latest View live